Deployment: Introduction to HaGrid
Hagrid (HAppy GRID!) is a command-line tool that speeds up the deployment of PyGrid, the software providing a peer-to-peer network of data owners and data scientists who can collectively train AI models using PySyft.
Hagrid is able to orchestrate a collection of PyGrid Domain and Network nodes and scale them in a local development environment (based on a docker-compose file). By stacking multiple copies of this docker, you can simulate multiple entities (e.g countries) that collaborate over data and experiment with more complicated data flows such as SMPC.
Similarly to the local deployment, Hagrid can bootstrap docker on a Vagrant VM or on a cloud VM, helping you deploy in an user-friendly way on Azure, AWS* and GCP*.
* Deploying to AWS and GCP is still under development.
Working with Hagrid & Syft API versions:
- Development mode
You can experiment with your own local checked-out version of Syft and bootstrap a local Jupyter Notebook where you can use the Syft & Grid API to communicate with a prod/local dev system.
- Production mode: You can specify the branch and repository you
want to fork (including your own fork) and Hagrid will monitor those branches in a cron job, pull new changes and restart the services to apply them, therefore your deployed system will always stay up to date.
Installation
Prerequisites
Ensure using Python3.7+; If you are having trouble navigating python dependencies, use conda:
Install conda following these instructions.
Create a new env specifying the Python version (we recommend Python 3.8/3.9):
conda create -n myenv python=3.8
conda activate myenv
(to exit): conda deactivate
Ensure having an up-to-date docker in your system by running:
sudo apt-get upgrade docker & docker run hello-worldInstall Docker Composite V2, which is needed to orchestrate docker, as explained below:
For Linux:
Install as described here.
You should see ‘Docker Compose version v2’ when running:
docker compose version
If not, go through the instructions here or if you are using Linux, you can try to do:
mkdir -p ~/.docker/cli-plugins
curl -sSL https://github.com/docker/compose-cli/releases/download/v2.0.0-beta.5/docker-compose-linux-amd64 -o ~/.docker/cli-plugins/docker-compose
chmod +x ~/.docker/cli-plugins/docker-compose
Also, make sure you can run without sudo:
echo $USER //(should return your username)
sudo usermod -aG docker $USER
For Windows, MacOs:
You can install Desktop Docker as explained here for Windows <https://docs.docker.com/docker-for-windows/install/>`__or `here for MacOS.
The
docker-composeshould be enabled by default. If you encounter issues, you can check it by:Go to the Docker menu, click
Preferences (Settings on Windows)>Experimental features.Make sure the Use
Docker Compose V2box is checked.
Make sure you are using the 0.6.0 branch of the PySyft repository (branch can be found here)
Explore locally with the PySyft API (no containers involved):
Make sure you use last version of pip (pip>=21.2.1) (pip -V)
Install tox:
pip install tox
Move to the correct branch in the PySyft repository:
git checkout 0.6.0Check current tasks that can be run by tox:
tox -l
Open an editable Jupyter Notebook which doesn’t require to run in a container:
tox -e syft.jupyter
Local deployment using Docker
Install Hagrid:
pip install hagrid
Launch a Domain Node:
hagrid launch domain
Note
First run it might take ~5-10 mins to build the PyGrid docker image. Afterwards, you should see something like:
Launching a domaing PyGrid node on port 8081 !

- TYPE: domain
- NAME: mystifying_wolf
- TAG: 035c3b6a378a50f78cd74fc641d863c7
- PORT: 8081
- DOCKER: v2.0.0-beta.5
Optionally, you can provide here additional args to use a certain repository and branch, as:
hagrid launch domain --repo $REPO --branch $BRANCH
Go to
localhost:port/loginin your browser (using the port specified in your CLI, here 8081) to see the PyGrid Admin UI where you, as a data owner, can manage your PyGrid deployment.Log in using the following credentials:
changethis
Explore the interface or you can even do requests via Postman. You can check all the available endpoints at http://localhost:8081/api/v1/openapi.json/ and have all the following environment variables set (a more detailed explanationcan be found in this video section):
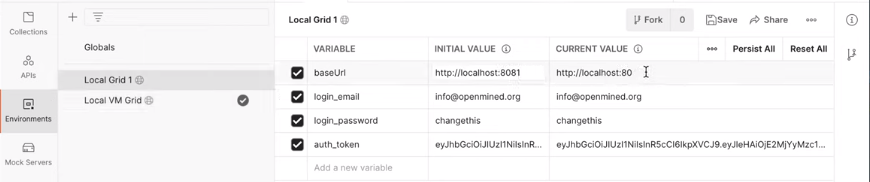
The auth token can be obtained by doing a login request as follows:

While the Domain Node is online, you can start a Jupyter Notebook as described above to use PySyft to communicate to it in a Python client rather than a REST API. Connecting to it can be done as following:
import syft as sy

domain = sy.login(email='info@openmined.org', password='changethis', port=8081)

domain.store

domain.requests

Domain.users
To stop the node, run:
(using the TAG specified in your CLI) hagrid land --tag=035c3b6a378a50f78cd74fc641d863c7
Local deployment using Vagrant and VirtualBox
This is particularly useful to experiment with the Ansible scripts to test new changes.
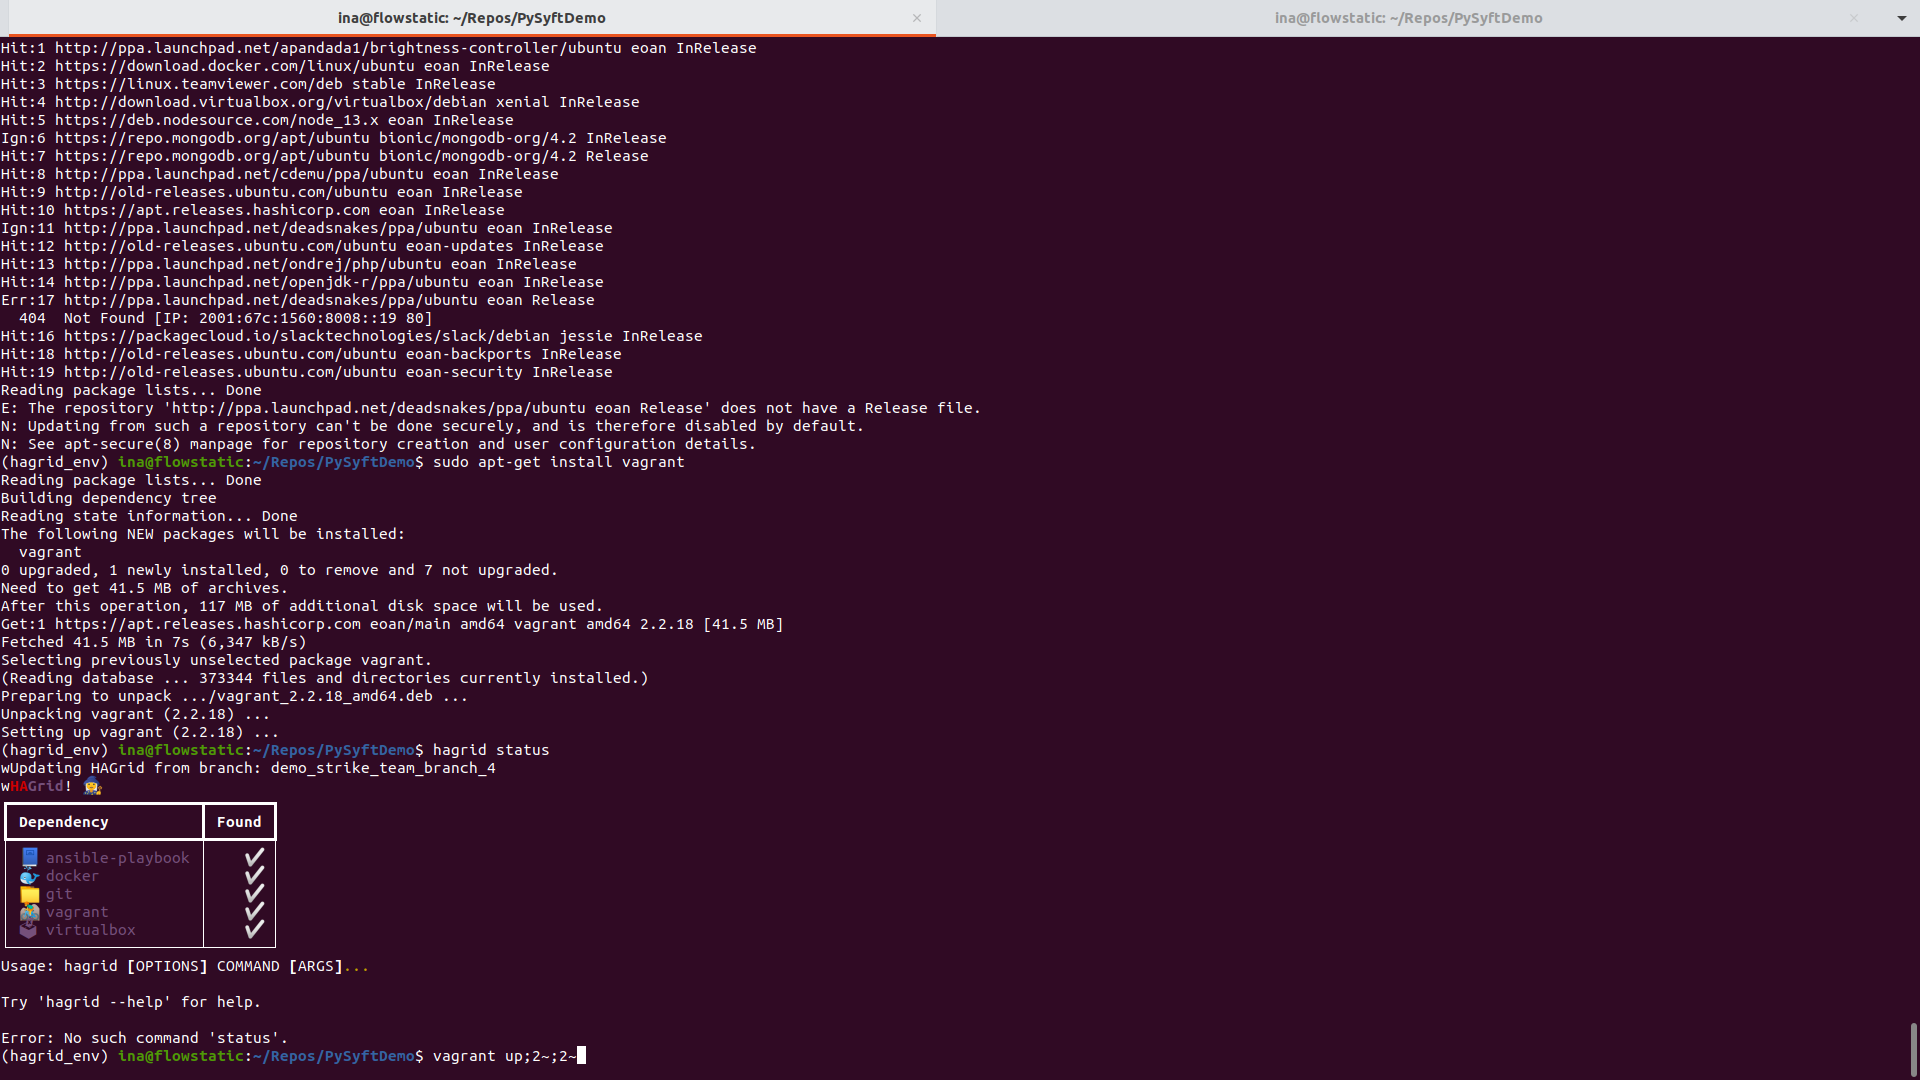
Run hagrid status and ensure all dependencies are checked to make sure you have Vagrant and VirtualBox installed.
For installing Vagrant, check the instructions here.
Additionally to Vagrant, we need to install a plugin called landrush that allows using a custom DNS that points to the IP address used in the VM:
vagrant plugin install landrush
Move to the correct branch and directory in the PySyft repository:
git checkout 0.6.0
cd packages/grid
Create the environment using vagrant for the first time:
vagrant init
vagrant up
When the VM is booted up, it starts the docker service and then the docker service starts all the containers as configured. As it is just created, provisioning is always run automatically.
When deploying locally, the tasks listed in ‘main.yml’ for the node are not being run. Therefore, it does not have to do the lengthy setup every time (installing docker, cloning PySyft and launching the cronjob to reload PySyft).
Note
text
The tasks for the containers and nodes respectively can be found in *.yml files defined in
packages/grid/ansible/roles/containersandpackages/grid/ansible/roles/nodes- If you intend to run it frequently and not only once, either run
vagrant statusto see if the env has already been created and if yes, to
run vagrant up --provisionevery time to launch the provisioners, otherwise it is just resuming the existing machine.
- If you intend to run it frequently and not only once, either run
To access the VM via SSh and jump to the user we are creating in vagrant:
vagrant ssh
sudo su -om
whoami # should return 'om'
- You can go to
http://10.0.1.2/loginwhich is at port 80 to access the PyGrid Admin UI, which you can explore, query via Postman or in a local Jupyter Notebook using a Python client as described in steps 3 and 4 here.
- You can go to
To shut down the machine currently managed by Vagrant, you can run the following after exiting this node shell:
vagrant halt
Or alternatively to destroy it using:
vagrant destroy
Deploying to Azure
Get your virtual machine on Azure ready
To create one, you can either go to portal.azure.com or use this 1-click template available off-the-shelves.
If you proceed to create it yourself, make sure you respect the following:
Use
Ubuntu Server 20.04or newerSelect
SSH,HTTP,HTTPSas inbound portsHave at least
2x CPU,4GB RAM,40GB HDD.
Note
During creation, write down the username used and save the key locally. In case warnings arise regarding having an unprotected key, you can run:
sudo chmod 600 key.pem
To deploy to Azure, the following can be run:
hagrid launch node --username=azureuser --key_path=~/hagriddeploy_key.pem domain to 51.124.153.133
Additionally, you are being asked if you want to provide another repository and branch to fetch and update HAGrid, which you can skip by pressing
Enter.- If successful, you can now access the deployed node at the specified IP address and interact with it via the PyGrid Admin UI at http://51.124.153.133/login (change IP with yours) or use Postman
to do API requests.